Home Insemination Timeline: Planning Guide

For couples or single moms by choice who are using donor sperm and who don’t have any known fertility issues, home insemination is one way to make the process of conception more intimate, cozy, and comfortable. Whether you have procedure anxiety, are trying to cut down on medical costs, or simply prefer to be in the comfort of your own home, a home insemination procedure can be just the solution.
1. Find Your Donor
The first step in the home insemination process is to choose your sperm donor. Whether you’re using sperm from a known donor or a sperm bank, it is advised to work with a trusted bank to clean, screen, and store the samples. If you’re buying sperm, we suggest purchasing several vials (at least two, and perhaps up to five) of your preferred sperm donor. This is because it often takes several insemination attempts to achieve pregnancy. If you plan on having multiple children in the future and want to use the same donor, it’s worth considering the purchase and storage of more vials to avoid the risk of your chosen donor selling out.
As you choose your donor, know that trusted sperm banks screen for infectious disease, genetic conditions, and sperm quality. The choice of which donor to select is completely personal and family centric. Some families like to choose based on physical characteristics that resemble their own, while others prefer to look at educational background, CMV status, or other priorities. Spend some time determining what matters to you and your partner (if applicable). If you’re looking to find a donor based on specific physical characteristics using a photograph, consider trying Fairfax FaceMatch® .
2. Prepare Your Body
While you’re considering your donor options, it’s also time for you (or your partner, if they will be the gestational parent) to get a fertility workup and general health check. Go to the dentist—dental health is very important during pregnancy—and attend to any other health-related issues. Consider your nutrition, physical activity, sleep, and hygiene, and optimize where you can. You want your body to be in prime condition for the insemination procedure.
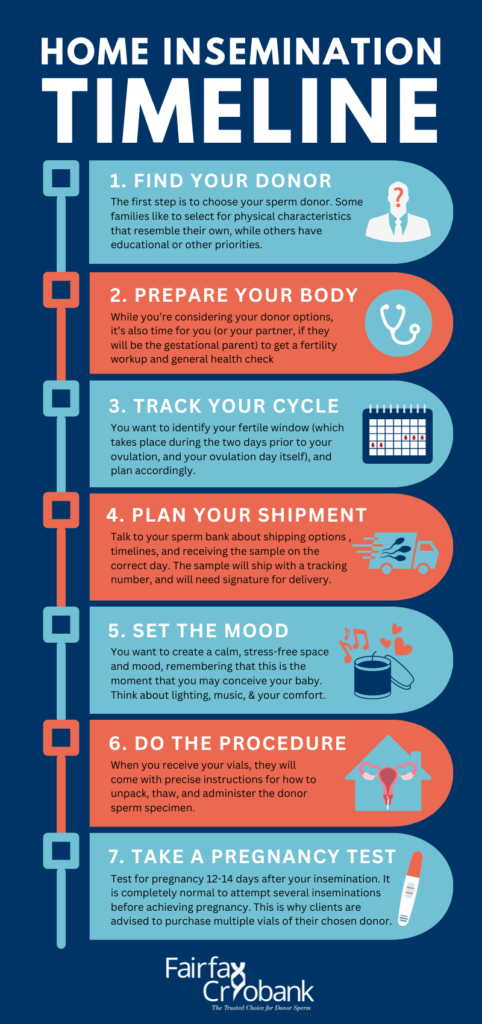
3. Track Your Cycle
Once you have the go-ahead from your doctor and you’ve selected your donor, the next step is planning the actual timing of the procedure. You want to identify your fertile window (which takes place during the two days prior to your ovulation, and your ovulation day itself), and plan accordingly. You can work with your doctor, use LH ovulation tracking strips, or use an app like Clue, Flo, or others to track your cycle and ovulation window.
4. Plan Your Shipment
Talk to your sperm bank about shipping options and timelines, and coordinate receiving the sample on the correct day of your cycle. The sample will ship with a tracking number, and you (or another adult) will need to be home to sign for the delivery.
4. Set the Mood
As you work on setting up these logistics, you want to also attend to your environment and get it set up for your comfort. Where will you do the insemination? Who will do it—you, or your partner? You want to create a calm, stress-free space, and mood. Remember, this is the time that you may conceive your baby. Think about lighting, music, and anything else that feels important to you, your family, and your comfort. Have fun with it too! Family planning can be stressful and it’s important to appreciate the little moments along the way.
6. Do the Procedure
When you receive your vials, they will come with precise instructions for how to unpack, thaw, and administer the sperm. You’ll lay down, using a pillow to raise and support your hips to take advantage of gravity (you don’t want the sperm to run right back out of your vagina). Once you or your partner inject the sperm into your vagina, you’ll lay in the same position for about thirty minutes (make sure you’ve used the bathroom beforehand and have whatever you’ll need close by). Some people will also choose to use what’s called a cervical cap or even a menstrual cup for several hours to help keep the sperm from running out of the vagina after you get up and begin moving around. Success rates of these devices are anecdotal, so talk to your fertility doctor about whether they recommend using them or not.
7. Take A Pregnancy Test
You can test for pregnancy 12-14 days after your insemination. Some people report experiencing an “implantation cramp” sooner than that, but that is not the case for all people, so don’t worry if you don’t notice one. Know that it takes several attempts for many people to become pregnant, and that not achieving pregnancy on your first round doesn’t necessarily indicate any issues.
If you have any questions about your family-building journey using donor sperm and home insemination, explore our resources page. You can also call our client services team with any questions you may have about the process.